Far Cry 4 was being given away for free a couple days ago on Uplay Ubisoft Connect and as a fan of the series, I got a copy for my girlfriend so that we could play together in co-op. It’s fun and it’s definitely worth a try if you like to play FPS games.
The setup we use for playing games is quite unique. We have a computer with two 12-core CPUs and two dedicated GPUs. This runs two VMs with their own GPU and USB controller assigned to them using PCIe passthrough. Theoretically, this should be more than enough for an 8 year old game to run smoothly, but when I started the game, it turned out to be a really bad experience. It wasn’t the usual FPS lag. The game was running at a stable 60+ FPS, but whenever I attempted to move the character or pan the camera around, the frame rate immediately plummeted to the single digit range. I’ve seen a similar issue when trying to play Control on the same VM, but I thought it was simply a matter of an underpowered CPU or GPU, as I’ve never tried running that game on bare metal.
So, what’s happening? As a sanity check, I decided to do a quick bare metal Windows installation to see how the game runs there. It was perfectly fine, which means that the issue originates from the virtualization layer. Let’s have a look at the physical machine running the hypervisor:
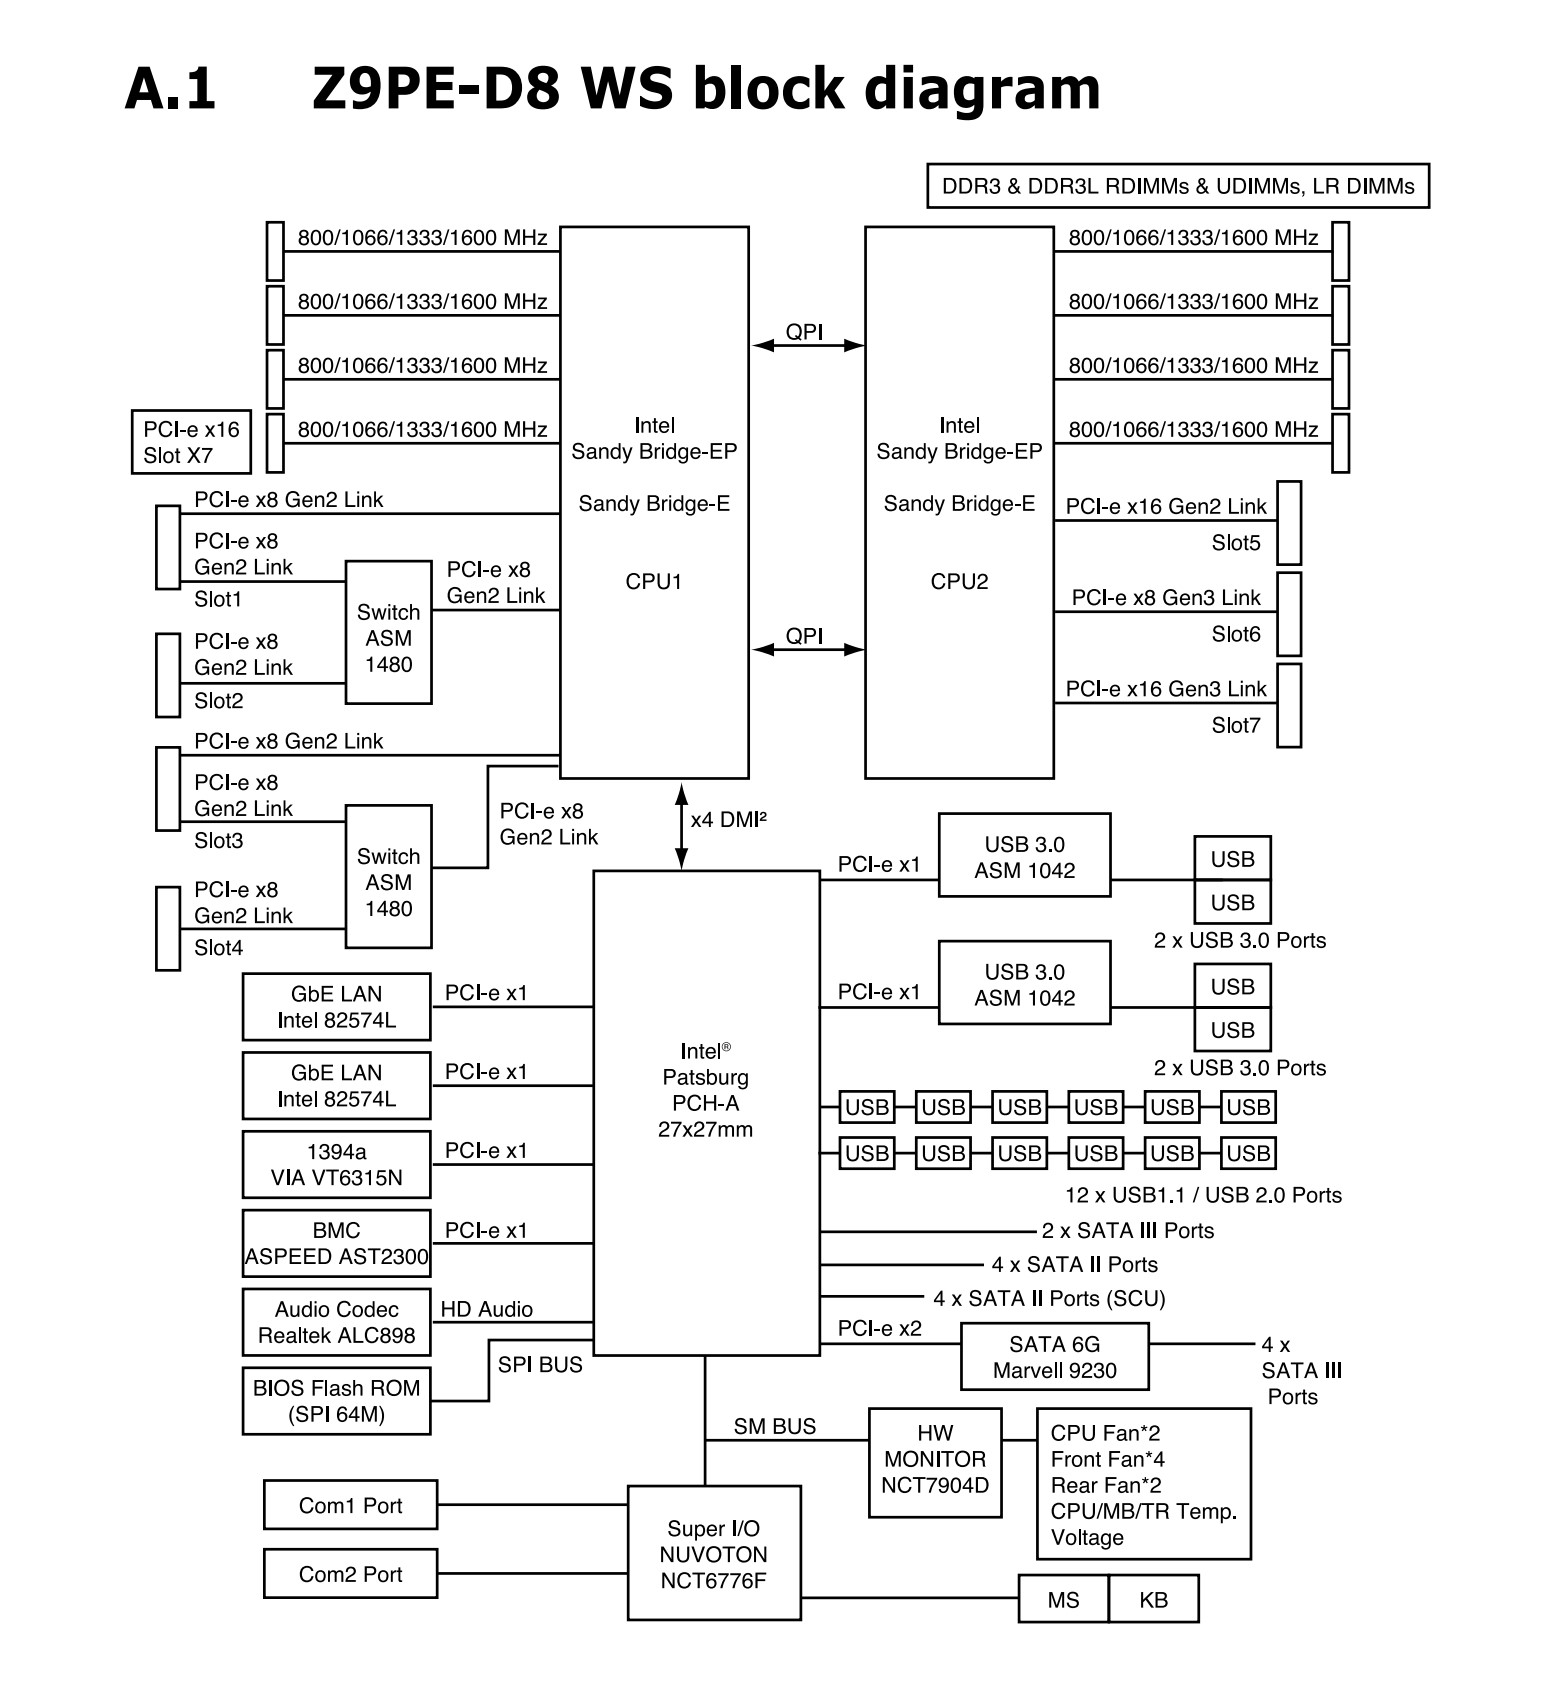
The block diagram shows the two CPUs, which are Xeon E5-2696v2s, the four memory channels connected to each one of them and the two QPI links between. This means there are two NUMA nodes, which stands for Non-Unified Memory Access. CPU1 can access the contents of its own half of the memory directly, but can only access the contents of the other half by going to CPU2 through the QPI links. QPI links are not as fast as the internal bus of the CPU, and as such, these maneuvers add a significant amount of latency. If both CPUs work on the same dataset which is stored in either of the CPUs memory, then the other CPU would experience a significant overhead when accessing it. H.265 encoding is one of these situations, as I routinely see the secondary CPU only running at around 60-70% while the primary is at 100%, likely due to this added overhead.
This can also affect the performance a VM running on the computer. By default, the cores to a VM are allocated in a nondeterministic way. This means they may be spread across the two CPUs, which would introduce the scenario above. However, this can be further amplified if the VM has PCIe devices attached to it, as those devices are wired to one of the CPUs and if the thread that is generating the load for the GPU is running on CPU1, while the GPU is attached to CPU2, then all the instructions will first need to pass the QPI link.
To add a little meaning to the above diagram, here are the speeds of the buses which are included:
- The QPI links are running at 8GT/s each, which is equal to 32GB/s. This is actually 16GB/s in each direction. As there are two of them, that makes it 32GB/s bidirectional.
- The memory is running at 1333Mhz, which is 10.6GB/s per channel. For a quad channel config, that’s 10.6*4 = 42.6GB/s
- The Quadro K5000 and Vega 56 are connected at 8GB/s and 16GB/s respectively. One lane of PCIe 2.0 can do 5GT/s, which is 500MB/s and a 3.0 lane can do 8GT/s, which is 0.98GB/s.
- The chipset is connected at 2GB/s using a DMI 2.0 link to the primary CPU. It’s really is just a fancy name for an x4 PCIe 2.0 link.
You can find out a lot more about these interconnects on Wikipedia.
Let’s get back to the issue. The extra latency introduced by the QPI link. The solution is to remove it from the equation. Ensure that the VMs won’t need to send any data over it. That can be achieved by restricting the pool of CPU cores that the VMs are allowed to use. Or create a direct mapping between physical and virtual cores. The latter is called CPU pinning and is exactly what I’ll set up.
The issue surfaced on Proxmox and I decided to move to a different hypervisor. I tested XCP-ng, which worked really well out of the box, but I wanted a little more flexibility, so in the end I settled on Fedora Server 36. It has a nice GUI to control the VMs, but we’ll need some more in-depth settings, which can be added using the virsh command line tool.
There are a couple of things we need to do:
- Isolate the CPU cores from the host
- Pin these cores to the VM
- Remove Hyper-V optimizations
- Set the CPU type to host-passthrough
The first can be done by adding the isolcpus parameter to the GRUB_CMDLINE_LINUX line of the /etc/default/grub file, then updating the grub configuration using grub2-mkconfig.
GRUB_CMDLINE_LINUX=" ...isolcpus=0,1,2,3,4,5,6,7... "Of course, only isolate the cores you have and leave a few for the host. Linux won’t schedule any threads on the listed cores. There are other parameters required to configure the PCIe passthrough, but this is about optimizations and not the passthrough itself.
Next, we have to edit the VMs. I’ve noticed that using Hyper-Threading makes things noticeably worse, so I’m only using one thread per core. The way they are numbered depends on the OS, the lscpu command can help in figuring this out. In my case, cores 0-11 and 24-35 belonged to CPU1 and 12-23 and 36-47 belonged to CPU2. The threads were set up in a way that core 0-24, 1-25, 2-26 etc. belonged to the same physical core on the CPU. The cputune section will tell the hypervisor to pin 10 cores of CPU2 to a VM with the rest of the cores used as emulatorpins. The numatune section ensures that all the RAM the VM gets allocated stays within CPU2’s node. (They use 0-based indexing, so in reality, there is CPU0 and CPU1) The values used in the cpuset values and the corresponding HT threads should be used in the isolcpus parameter of grub, as described in the previous section.
<vcpu placement='static'>10</vcpu>
<cputune>
        <vcpupin vcpu='0' cpuset='14'/>
        <vcpupin vcpu='1' cpuset='15'/>
        <vcpupin vcpu='2' cpuset='16'/>
        <vcpupin vcpu='3' cpuset='17'/>
        <vcpupin vcpu='4' cpuset='18'/>
        <vcpupin vcpu='5' cpuset='19'/>
        <vcpupin vcpu='6' cpuset='20'/>
        <vcpupin vcpu='7' cpuset='21'/>
        <vcpupin vcpu='8' cpuset='22'/>
        <vcpupin vcpu='9' cpuset='23'/>
        <emulatorpin cpuset='12-13'/>
</cputune>
<numatune>
        <memory mode='strict' nodeset='1'/>
</numatune>
The next step is to remove the Hyper-V optimizations that are added by default. This is quite simple, just remove the entire <hyperv> section from the VM’s config, which usually looks like the below:
<hyperv>
   <relaxed state='on'/>
   <vapic state='on'/>
   <spinlocks state='on' retries='8191'/>
<hyperv/>
The last step is to set the CPU type to host-passthrough or if that’s not available, choose the option that’s closest to the host CPU’s architecture. This tells the VM what instruction sets and extensions are available on the CPU and can help speed things up.
You can also disable HT altogether in the BIOS, but I have a few more VMs which can take advantage from the extra threads and aren’t used for gaming, so I decided to leave them in place. As you have probably noticed, I isolated both threads of 10 cores from each CPU, but have only assigned one thread from each core to the gaming VM. This prevents the host OS from using either of the threads, otherwise the host may use the non-isolated threads which could affect the performance of the other thread on that core.
I hope someone will find the above useful, I spent a few days experimenting with the different settings and found that this was adequate to ensure that the games were playable. However, it’s likely that there are more tweaks out there which can further optimize the performance, so if you have some ideas, do leave them in the comments.
Leave a Reply