Since I like to play games, and doing so with friends is even better, I decided to put together a hypervisor that could be used to run games on physical LAN parties. It would host a couple of virtual machines with GPU acceleration, all pre-configured to allow incoming RDP connections using Sunshine.
Essentially a local GeForce NOW server.
This accomplishes two things:
- One, the server is powerful enough to run the games, which allows people to bring any laptop to play on, as long as it can decode the video, which is a fairly easy task.
- Two, it alleviates any software and network issues that may arise, meaning we would have a working environment all the time, instead of having to figure out why one of the machines can’t see the others or can’t connect to the server.
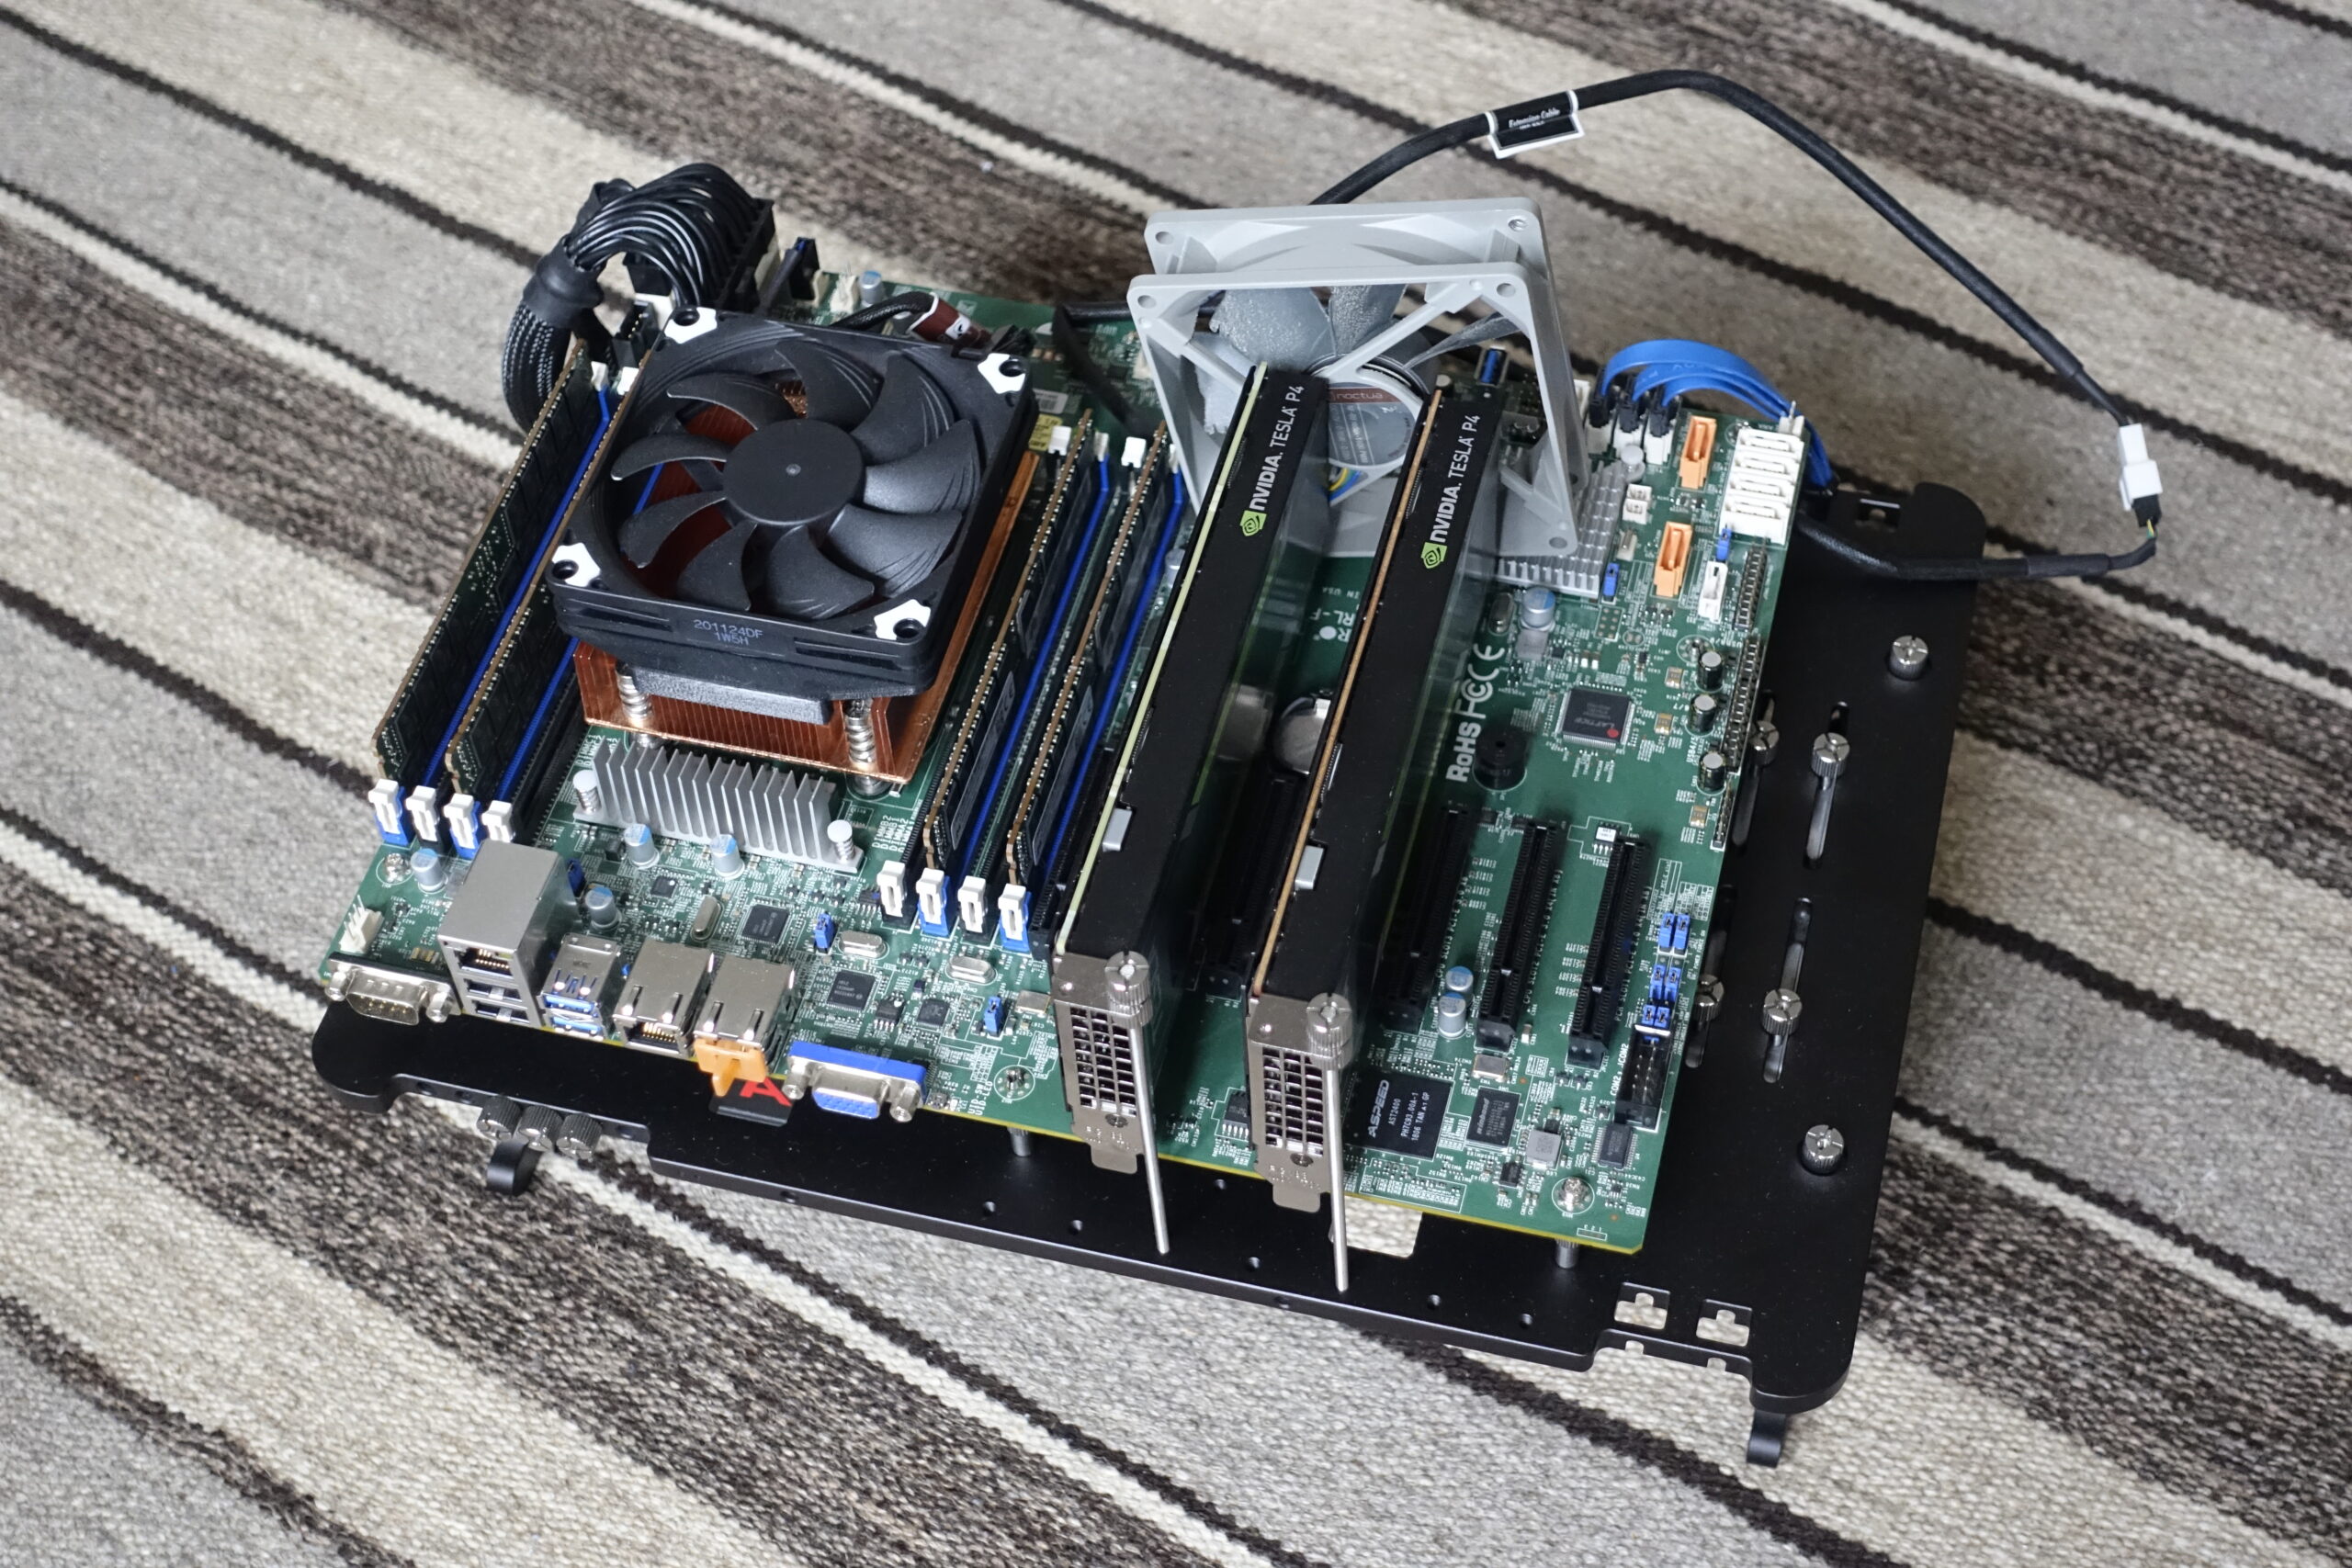
To make it work, I’ll be using some fairly cheap hardware. My target is to run 4 copies of older games from 2005-2015 in 1080p, which shouldn’t be too difficult. The list of components is below:
- Supermicro X10SRL-F
- Intel Xeon E5-2699v3 with 18-cores, 4 for four VMs and 2 for host
- 4 x 32GB DDR4 ECC RDIMM
- 2 x Nvidia Tesla P4 GPUs
- 240GB Intel SSD DC S3520 for the hypervisor
- 2 x 1.6TB Intel SSD DC S3520 for the VMs in RAID0
- A Corsair HX860 PSU, which is still going strong after 10 years
The system is based on Fedora with libvirt as the hypervisor, Nvidia’s GRID drivers, Sunshine and Moonlight as the remote desktop solution and Win10 as the guest OS, although that can be replaced with any compatible OS.
This guide assumes some existing knowledge of Fedora, Cockpit and libvirt and therefore it is possible that some steps won’t be explained in every detail. It is mainly based on this guide by Nvidia, but I have made some adjustments wherever I had to.
Setting up the GRID drivers
I’m using Fedora 38 Server as the hypervisor. There are probably some better solutions out there, such as Proxmox and RHEL, but I don’t need Proxmox’s clustering capabilities and while RHEL would be very nice, since it has first party support from Nvidia, as well as a graphical interface for managing vGPUs, a one-year subscription would cost about as much as the PC itself.
So, Fedora it is. And that’s where the problems start. After installing F38 Server, the kernel needs to be downgraded, as the most recent NVIDIA-GRID-Linux-KVM-535.104.06-535.104.05-537.13 driver does not work with kernels more recent than kernel-6.4.14-200.fc38, which has now been superseded by more recent versions.
To do this, we need to manually download and install the older rpm packages1. Once installed, they should be set as default in grub. After this, disable the kernel updates in dnf.
If Nvidia updates their driver package, this step may not be required and you can jump to the next section.
# create a folder
mkdir kernel_6.4.14
cd kernel_6.4.14/

# download files, note that the mirror will probably change
wget https://kojipkgs.fedoraproject.org//packages/kernel/6.4.14/200.fc38/x86_64/kernel-6.4.14-200.fc38.x86_64.rpm
wget https://kojipkgs.fedoraproject.org//packages/kernel/6.4.14/200.fc38/x86_64/kernel-core-6.4.14-200.fc38.x86_64.rpm
wget https://kojipkgs.fedoraproject.org//packages/kernel/6.4.14/200.fc38/x86_64/kernel-modules-6.4.14-200.fc38.x86_64.rpm
wget https://kojipkgs.fedoraproject.org//packages/kernel/6.4.14/200.fc38/x86_64/kernel-devel-6.4.14-200.fc38.x86_64.rpm
wget https://kojipkgs.fedoraproject.org//packages/kernel/6.4.14/200.fc38/x86_64/kernel-modules-core-6.4.14-200.fc38.x86_64.rpm

# install all files in folder
sudo dnf install *

# add the below line to /etc/dnf/dnf.conf to prevent dnf from updating the kernel
exclude=kernel*
Let’s disable the noveau drivers as well, otherwise they would prevent the installation of the NV drivers.
# create the /usr/lib/modprobe.d/disable-nouveau.conf file
sudo nano /usr/lib/modprobe.d/disable-nouveau.conf

# paste the below two lines in the file and save
blacklist nouveau
options nouveau modeset=0

# execute the below, updating modprobe
sudo dracut --force

# reboot the system
sudo shutdown -r now
If the kernel wasn’t an issue, you would normally install gcc and kernel-devel and now attempt to install the NV drivers2.
# install dependencies
sudo dnf install gcc kernel-devel
# make the driver executable after uncompressing the archive
unzip NVIDIA-GRID-Linux-KVM-535.104.06-535.104.05-537.13.zip -d grid-linux
cd ./grid-linux/Host_Drivers/
chmod +x NVIDIA-Linux-x86_64-535.104.06-vgpu-kvm.run
# adding the --dkms flag to add the driver to dkms
sudo ./NVIDIA-Linux-x86_64-535.104.06-vgpu-kvm.run --dkms
If everything went well, you should be able to type in nvidia-smi and see something similar to the below:
Tue Sep 19 16:34:41 2023
+---------------------------------------------------------------------------------------+
| NVIDIA-SMI 535.104.06             Driver Version: 535.104.06   CUDA Version: N/A      |
|-----------------------------------------+----------------------+----------------------+
| GPU  Name                 Persistence-M | Bus-Id        Disp.A | Volatile Uncorr. ECC |
| Fan  Temp   Perf          Pwr:Usage/Cap |         Memory-Usage | GPU-Util  Compute M. |
|                                         |                      |               MIG M. |
|=========================================+======================+======================|
|   0  Tesla P4                       On  | 00000000:03:00.0 Off |                    0 |
| N/A   36C    P8              10W /  75W |     31MiB /  7680MiB |      0%      Default |
|                                         |                      |                  N/A |
+-----------------------------------------+----------------------+----------------------+
|   1  Tesla P4                       On  | 00000000:04:00.0 Off |                    0 |
| N/A   34C    P8              10W /  75W |     31MiB /  7680MiB |      0%      Default |
|                                         |                      |                  N/A |
+-----------------------------------------+----------------------+----------------------+

+---------------------------------------------------------------------------------------+
| Processes:                                                                            |
|  GPU   GI   CI        PID   Type   Process name                            GPU Memory |
|        ID   ID                                                             Usage      |
|=======================================================================================|
|  No running processes found                                                           |
+---------------------------------------------------------------------------------------+
Adding the virtual machines
To add virtual machines, we need to install libvirt and cockpit-machines for a nice web interface, then enable libvirtd.
# install cockpit-machines
sudo dnf install cockpit-machines

# enable libvirtd
sudo systemctl enable --now libvirtd
After the above, logging out and back in will show us the virtual machines tab. Here, just create a VM and install windows as normal. I suggest using the virtio drivers, which can speed up networking and disk i/o. To do this, edit the VM before first running it and add an additional DVD drive with the downloaded .iso file loaded. Also change the type of the disk and network adapter to virtio. Oh, and create a network bridge that you can then use with the network interface, set to “Bridge to LAN” type.
Once we have created a VM, let’s add the GPU!
First of all, I would like to explain how vGPUs work. Nvidia has a nice user guide, but I would like to expand on that a bit more. Each GPU can be sliced up into multiple pieces, these are the so-called vGPUs, such as two halves with half the processing power and VRAM each. These vGPUs all need to be the same type within a physical GPU. (There are MIG-backed configurations that could allow this, but this guide does not cover that.) If you have multiple physical cards, then you can split them up differently. There are also multiple virtual GPU types, which are listed in the table below. For games, we’ll need the Q-series.
| Series | Optimal Workload |
|---|---|
| Q-series | Virtual workstations for creative and technical professionals who require the performance and features of Quadro technology |
| C-series | Compute-intensive server workloads, such as artificial intelligence (AI), deep learning, or high-performance computing (HPC)2, 3 |
| B-series | Virtual desktops for business professionals and knowledge workers |
| A-series | App streaming or session-based solutions for virtual applications users6 |
So, back to the GPUs. I have two Tesla P4s and I would like to cut both in half, powering four VMs at the same time. The list for the vGPU types of the Tesla P4 tells us that what we need is the P4-4Q vGPU type. Great. It’s not going to be that easy, however. We’ll need to figure out that this is actually referred to as the nvidia-65 type id. But let’s not get ahead of ourselves.
To slice up the GPUs, we need to create some xml-based definitions for each vGPU and then import these using virsh. Then, these imported devices can be assigned to virtual machines.
Creating and importing vGPU definitions
First, let’s check the type id of the vGPU we want to use. If we execute the lspci command, we should find our GPU.
# this grabs the devices with 'NVIDIA' in their name
lspci | grep -e NVIDIA

# which gives us the below
03:00.0 3D controller: NVIDIA Corporation GP104GL [Tesla P4] (rev a1)
04:00.0 3D controller: NVIDIA Corporation GP104GL [Tesla P4] (rev a1)
This gives us the PCI device addresses of the two cards, namely 03:00.0 and 00:04.0. Then, we need to find these devices in the /sys/bus/pci/devices folder.
The first device is going to be at /sys/bus/pci/devices/0000:03:00.0
Note the extra 0000: prefixed to the address, which is the domain part of the address and is not returned by lspci.
So, to list all the modes that a card supports, we need to list the contents of the mdev_supported_types, as below:
# list the available types
ls /sys/bus/pci/devices/0000:03:00.0/mdev_supported_types
# this will return
nvidia-157  nvidia-214  nvidia-243  nvidia-63  nvidia-64  nvidia-65  nvidia-66  nvidia-67  nvidia-68  nvidia-69  nvidia-70  nvidia-71

# to get the stylized names
cd /sys/bus/pci/devices/0000:03:00.0/mdev_supported_types
cat nvidia-157/name
# which gives us
GRID P4-2B
Essentially, there is an mdev_supported_types folder, which lists all the available vGPU types for the device and each type has a name attribute, which contains the name, that correspond to the vGPU types.
The GRID P4-4Q type is assigned to nvidia-65.
Now we’re ready to create the xml files defining the vGPU devices. They will each need a unique UUID, which can be generated using the uuidgen command. To add a GRID P4-4Q device to the GPU at 03:00.0, save the below to an empty file. There are no constraints to its name or location, but for the purposes of this demo, it’ll be grid_p4_4q_00.xml.
<device>
    <parent>pci_0000_03_00_0</parent>
    <capability type="mdev">
        <type id="nvidia-65"/>
        <uuid>f7ad1c61-c983-4e47-879a-c05d01004ca7</uuid>
    </capability>
</device>
Once created, these files need to be imported to libvirt using virsh. You may have to prefix these with sudo.
# define new device
virsh nodedev-define grid_p4_4q_00.xml

# list inactive devices to get the device id
virsh nodedev-list --cap mdev --inactive
# this returns
mdev_f7ad1c61_c983_4e47_879a_c05d01004ca7_0000_03_00_0

# start device
virsh nodedev-start mdev_f7ad1c61_c983_4e47_879a_c05d01004ca7_0000_03_00_0

# enable auto start using
virsh nodedev-autostart mdev_f7ad1c61_c983_4e47_879a_c05d01004ca7_0000_03_00_0
# which will confirm that with
Device mdev_f7ad1c61_c983_4e47_879a_c05d01004ca7_0000_03_00_0 marked as autostarted
And with that, one vGPU is created. Repeat for each vGPU, using a different uuid.
Finally, to assign them to a VM, we need to manually edit the config file for the VM, using sudo virsh edit <vm-name>, adding the below to the <devices> section of the xml file and saving it. Of course, make sure the VM is off whilst you do this.
<hostdev mode='subsystem' type='mdev' managed='no' model='vfio-pci' display='on'>
    <source>
        <address uuid='d7462e1e-eda8-4f59-b760-6cecd9ec3671'/>
    </source>
</hostdev>
And that should be it on the host side.
In the VMs, the added GPU should be visible and you can install the guest driver, which is included in the NV driver package. Once installed, you should have full 3D acceleration. Sunshine can now be installed to provide a gamestream server to which you can connect using moonlight. These have their own install guides, so just follow them depending on what operating systems you use.
Setting up the Delegated License Service
I have briefly mentioned licensing and the lack thereof will restrict the GPU acceleration to 3FPS after some time3. So, we need to license every vGPU instance in the guest VMs. To do this, we can use the dockerised version of Oscar Krause / FastAPI-DLS · GitLab (collinwebdesigns.de).
It has its own guide which is pretty good, but after installing docker on Fedora and rebooting, we will notice that all guest VMs have lost network connectivity and that’s because docker interferes with the virtual bridge that libvirt is using.
This can be fixed by modifying the kernel parameters using sysctl4.
# create /etc/sysctl.d/90-override-ip-forward.conf with the below contents
net.ipv4.ip_forward=1
Once that’s complete, you can follow the instructions to initialize and start the DLSS container using docker compose and leave it running, as per the Gitlab instructions. Once it’s up, the clients can be licensed and are ready to use.
Some hardware-specific tweaks
CPU pinning can greatly improve the performance of a VM by assigning or pinning specific CPU threads to a VM. Let’s look at some Cinebench R15 results.
| Default | Pinning | Delta | |
| Single | 71 | 89 | +25% |
| Multi | 732 | 489 | -33% |
| Multiplier | 10.30 | 5.41 |
It’s clear that it reduces the multi-core performance, but that’s because I set it up to use both threads of four physical cores, instead of the default setting, which likely picked one thread from eight different physical cores. The multiplier confirms this.
The single core performance is 25% better, which is great, but a 4770K at 4.4Ghz gets 165 points and a modern Tiger Lake 11800H gets 220. But then, I paid £25 for this CPU and it has 18 of these cores. I’m certain that virtualization overhead takes at least 15-20 points away as well.
To set it up, the below needs to be added to the .xml configuration of the VMs, similarly to how we added the vGPUs.
<vcpu placement='static'>8</vcpu>
<cputune>
        <vcpupin vcpu='0' cpuset='0'/>
        <vcpupin vcpu='1' cpuset='1'/>
        <vcpupin vcpu='2' cpuset='2'/>
        <vcpupin vcpu='3' cpuset='3'/>
        <vcpupin vcpu='4' cpuset='18'/>
        <vcpupin vcpu='5' cpuset='19'/>
        <vcpupin vcpu='6' cpuset='20'/>
        <vcpupin vcpu='7' cpuset='21'/>
</cputune>
The “vcpu” is the position of the virtual cpu core as it appears inside the VM and the “cpuset” is the number of the physical CPU core on the host. In our case, for an 18-core CPU with Hyper-threading enables, 0-17 are going to be the first thread on each core and 18-35 are going to be the second. This means that core 0 and core 18 are two threads which are both assigned to the same CPU core. Keeping this in mind, you can see that I assigned four cores and their respective threads to the VM in the above configuration, so that these cores are going to be dedicated to that specific VM only.
This CPU also supports COD mode, which is explained here. It essentially reduces the latency of communication between the cores, but splits the CPU into two quasi-NUMA-nodes. these nodes incorporate cores 0-8 and 9-17, but I pinned the cores in a way that there is no intra-NUMA communication required for any VM. Two will be assigned to the first cluster and two to the second, with one spare core in each cluster that the host can utilize for IO.
COD mode? The Magic Inside the Uncore – Intel Xeon E5 Version 3: Up to 18 Haswell EP Cores (anandtech.com)
Performance
I ran some benchmarks on the aforementioned GRID P4-4Q vGPUs and they are pretty impressive. Keep in mind that these have a TDP of 75W per card, so which is shared between two vGPU instances. The exact VM specs are below and for the tests, all of the tweaks that I’ve explained above have been enabled.
- Four CPU cores, Haswell µArch from 2014
- 28GB RAM
- GRID P4-4Q
The CPU is an up-to 3.6Ghz part and there is a way to allow all cores to run at that speed using some BIOS modifications, but I don’t currently have a cooler that would be able to handle that amount of heat, so all-core speeds are capped at 2.8Ghz at a power envelope of 145W.
The GRID P4-4Q is essentially half of a GP104-based GTX1080 at 886/1114Mhz base/boost clocks with 4GB of RAM, 1280 CUDA cores, 80 TMUs and 32 ROPs. These specs closely resemble the GTX1060, although that 48 ROPs and 6GB of RAM. However, the biggest difference is the TDP. An entire Tesla P4 is rated at 75W, which is shared by the two instances, while the GTX1060 can use up to 120W for a single instance. That is three times as much power as a GRID P4-4Q at 37.5W (half of 75W).
So let’s see what those 37.5W get us.
I ran a quick test using four instances of Rise of the Tomb Raider, each at 1080p High, the default settings using DX11 and DX12.
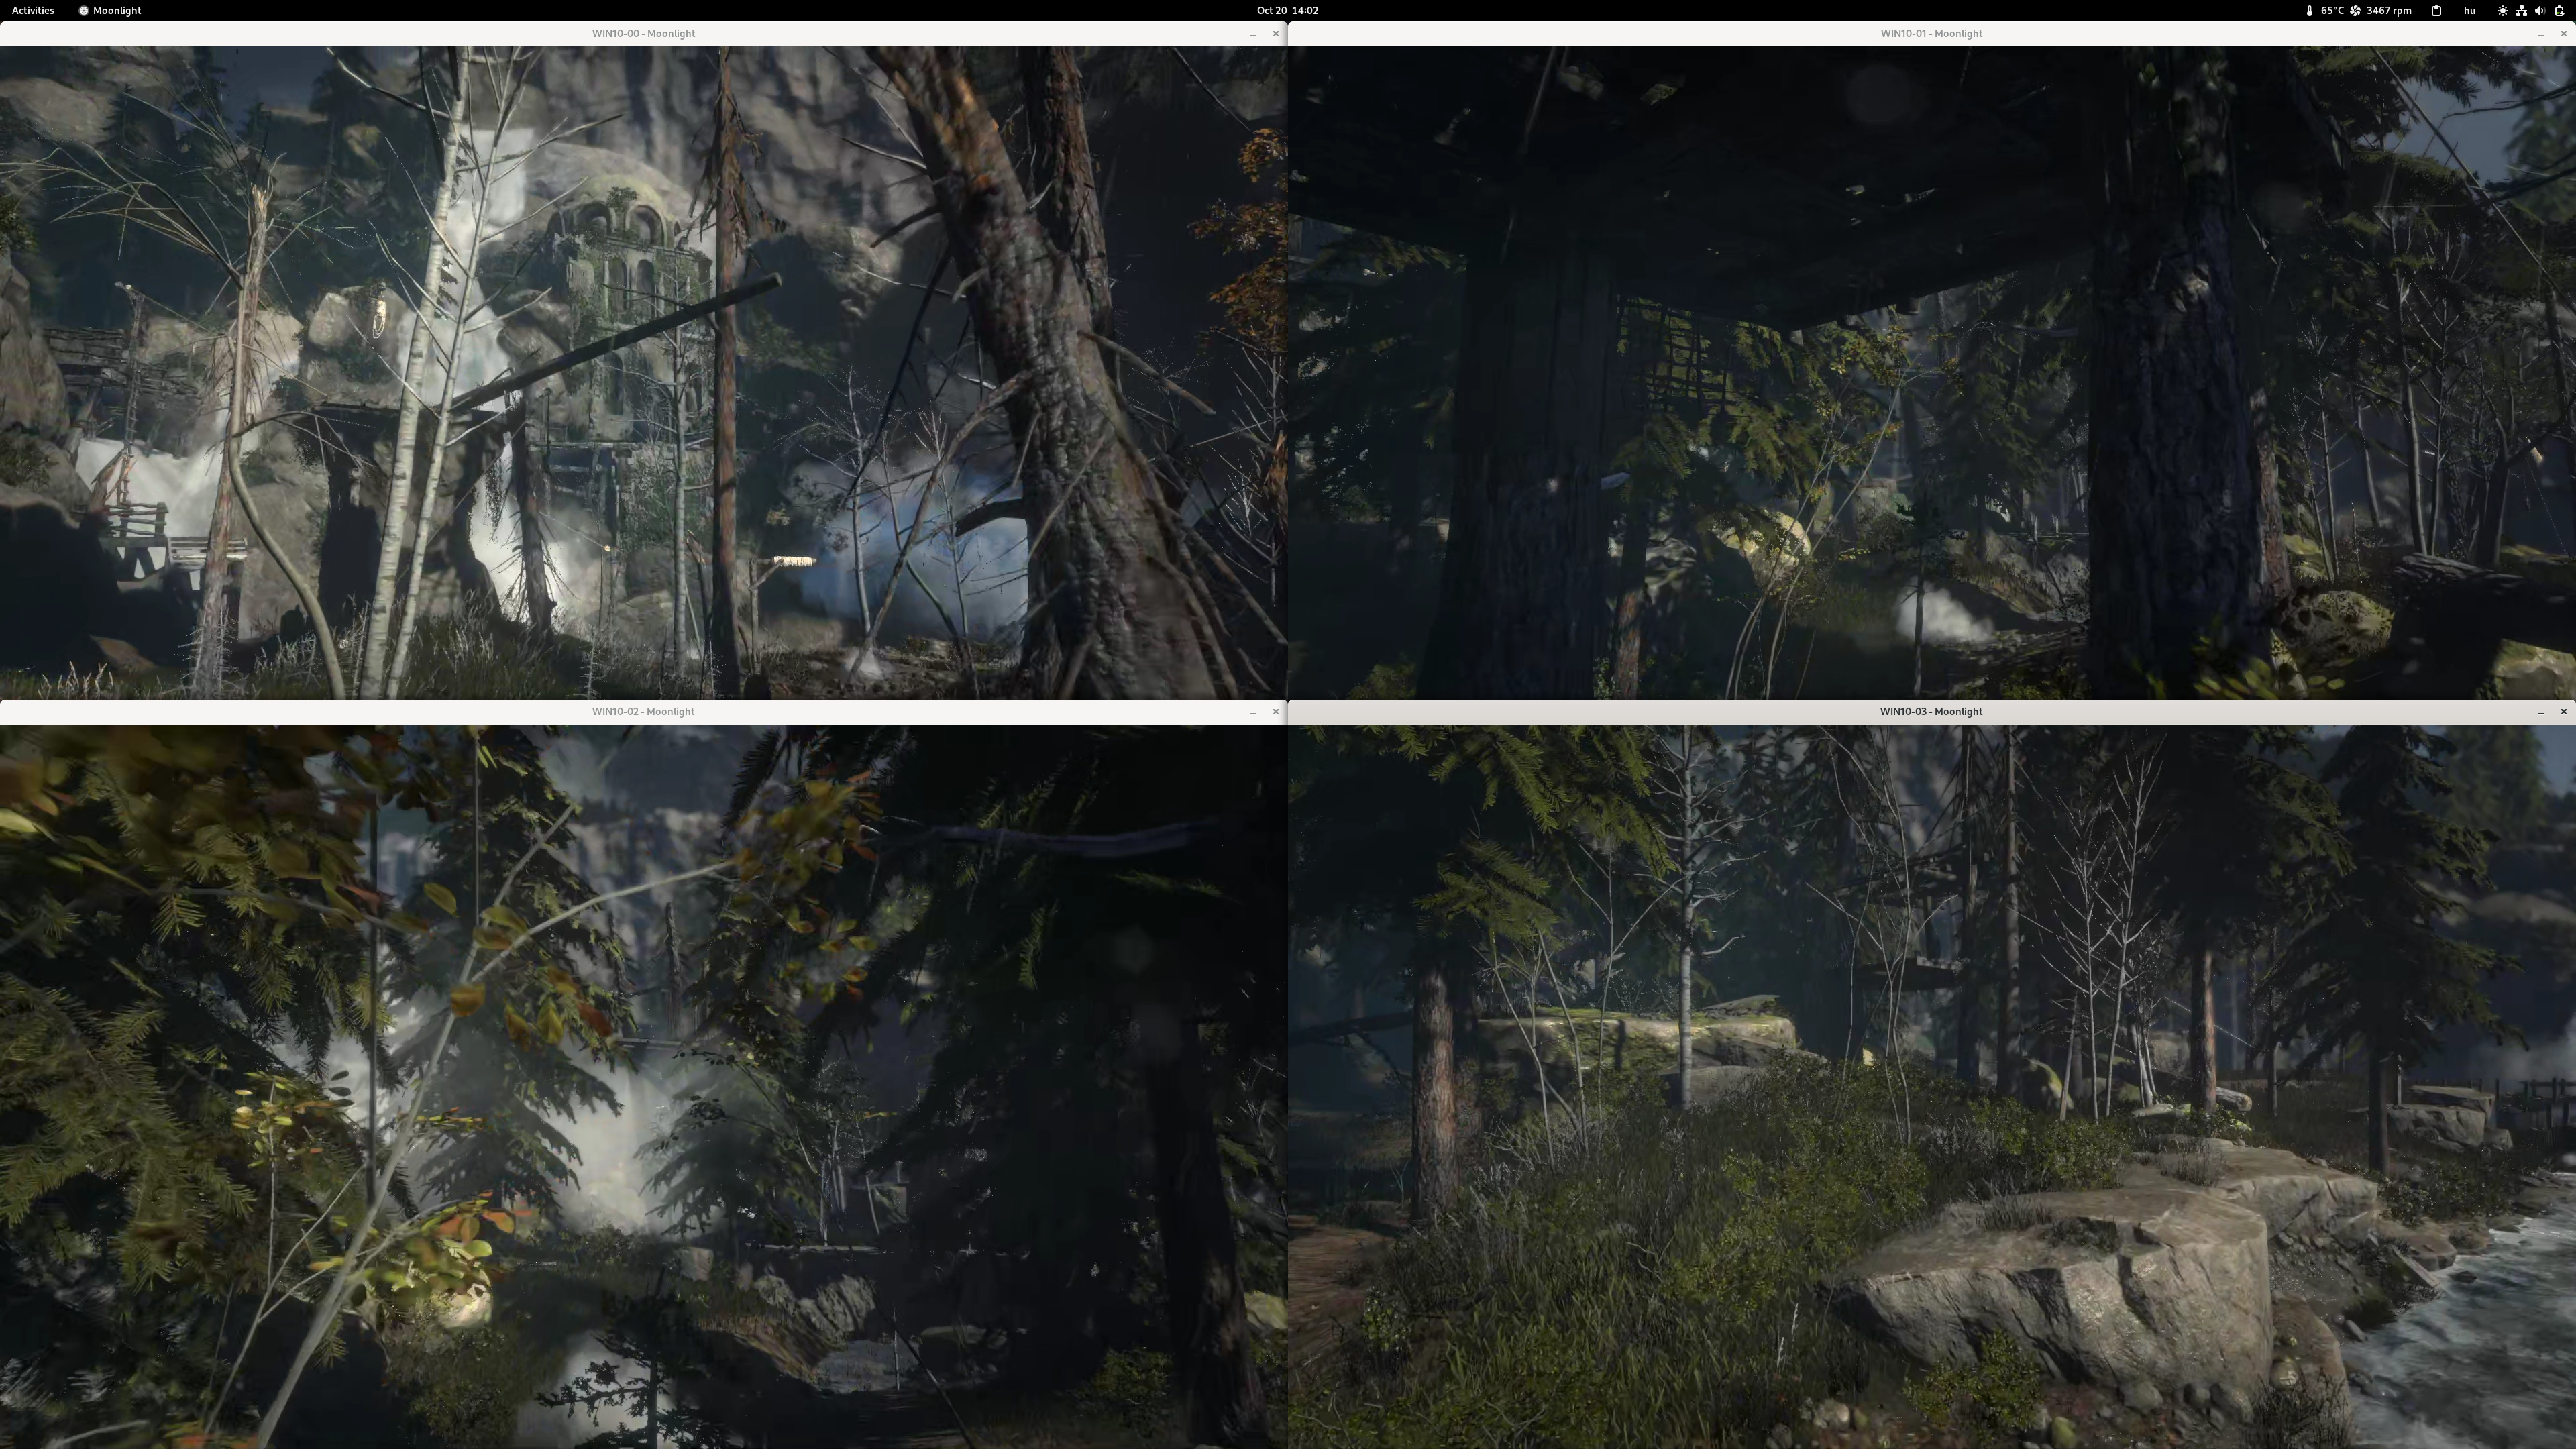
The four tests were ran in parallel, although I started them one after the other, as quickly as I could, so they weren’t perfectly in sync. The averages were around 37fps, which many would argue is not quite enough, and I know that. This is only included to provide a point of comparison to other systems.
| Rise of the Tomb Raider | Min | Avg | Max |
| DX11 | 35.99 | 37.32 | 38.41 |
| DX12 | 35.75 | 37.65 | 39.74 |
I also ran a round of Fire Strike v1.1, which yielded the below results. These were the averages across three VMs, as 3DMark kept crashing the fourth one.
| Fire Strike score | Graphics score | Physics score | Combined score |
| 7580 | 10257 | 7699 | 2557 |
This puts these slightly ahead of a GTX 1050Ti and at around 2/3 of the performance of a 6GB GTX1060, which gets a Graphics score of around 15000. That is quite respectable, considering that we accomplish this with only 37.5W of power, less than a third of the 120W TDP of the GTX1060 and half of the 75W TDP of the GTX1050Ti.
Compared to a GTX1060, a Tesla P4, or a GRID P4-4Q is twice as efficient, with 273.5pt/W vs 125pt/W for the GTX1060. This is really impressive, considering that both cards are build using the same manufacturing technology and are based on the same architecture. It looks like Pascal can be much more efficient at lower clocks, but consumer cards don’t really take advantage of that, as NVidia wants to squeeze out every last bit of performance from the chips in that sector.
Cinebench R15 (I was trying to use software that was appropriate for the age of the hardware) gave the results I expected, the below are the averages from four simultaneous runs.
| Multi | Single | Multiplier |
| 460 | 89 | 5.16x |
An i7-8650U would get 528 points, an i5-4570 would get 515 and an i7-4770k would get 822. So this is clearly not an amazing score, but it’s good enough for the use case. The Xeon has a base clock of 2.3Ghz and the turbo bins are 5/5/5/5/5/5/5/5/5/5/6/7/8/9/10/11/13/13, meaning that if all 18 cores are used, it can add 5*100Mhz, and if only one core is in use, it can run add an additional 13*100Mhz. So when 16 cores are running Cinebench, the best it can do is 2.3Ghz + 5*100Mhz, which is 2.8Ghz. If I downscale the score of the 4770k, which is based on the very same microarchitecture, then at 2.8Ghz, it would get 822/4.4*2.8=523 points, which isn’t that far from 460. I think I can call that virtualization overhead.
MOAR POWER!
So, if the above doesn’t quite cut it for the games you want to play, you can add more power by using a GRID P4-8Q instance, which will essentially double the resources of the vGPU, assigning all 2560 CUDA cores and 8GB of VRAM to the instance and should, in turn, double the performance. All of that is very nice, but having to create two extra VMs where you have to install all the games again isn’t particularly efficient. Fortunately, that’s not necessary.
The virtual hard disk files can be shared between multiple virtual machines, although you aren’t allowed to run more than one machine at a time. The easiest way to do it is to clone the machine using the GUI. This will create copies of the disks, but those can be deleted and the original disks from the other machine can be re-added. When you do this, you’ll be informed that the disk types will be changes to “shared”, which is fine.
Or a new machine can be configured from scratch with, perhaps, more cores or memory. What’s important is to have the same firmware configuration on both, either BIOS or UEFI.
The somewhat trickier part is the GPU. The process to create it is exactly the same, but this time we want the GRID P4-8Q, which is called nvidia-66. Of course, we also need to generate new UUIDs and we can only have one instance per PCIe address, as it uses the entire GPU.
<device>
    <parent>pci_0000_03_00_0</parent>
    <capability type="mdev">
        <type id="nvidia-66"/>
        <uuid>857fa60f-5347-4b11-8fc5-eb43d9aca9ff</uuid>
    </capability>
</device>
Then it needs to be imported too, using virsh. However, we won’t be able to start the device until we deactivate the two GRID P4-4Q instances that are attached to the same GPU. This is where it gets a little more complicated.
# define new device
virsh nodedev-define grid_p4_8q_00.xml

# the UUIDs of the two existing P4-4Q nodes on this GPU are:
# mdev_f7ad1c61_c983_4e47_879a_c05d01004ca7_0000_03_00_0
# mdev_5cb3ac3e_f1e6_48ec_96e7_9bf9cae73cfc_0000_03_00_0
# these need to be deactivated using the below
virsh nodedev-destroy mdev_f7ad1c61_c983_4e47_879a_c05d01004ca7_0000_03_00_0
virsh nodedev-destroy mdev_5cb3ac3e_f1e6_48ec_96e7_9bf9cae73cfc_0000_03_00_0

# these are now back to the list of inactive devices and should be listed by the below command:
virsh nodedev-list --cap mdev --inactive
# it returns
mdev_f7ad1c61_c983_4e47_879a_c05d01004ca7_0000_03_00_0
mdev_5cb3ac3e_f1e6_48ec_96e7_9bf9cae73cfc_0000_03_00_0
# and our new P4-8Q
mdev_857fa60f_5347_4b11_8fc5_eb43d9aca9ff_0000_03_00_0

# start the P4-8Q
virsh nodedev-start mdev_857fa60f_5347_4b11_8fc5_eb43d9aca9ff_0000_03_00_0

# you can enable auto start using, if you want the P4-8Q to be the default config instead, otherwise a reboot will reset it to the dual P4-4Qs
virsh nodedev-autostart mdev_857fa60f_5347_4b11_8fc5_eb43d9aca9ff_0000_03_00_0
That’s all very nice, but let’s make a script that does the same to make switching more convenient. Of course, the UUIDs will need to be replaced with the ones of your vGPUs.
#! /bin/bash
# this switches from the P4-4Qs to a P4-8Q
# to destroy the P4-4Qs
virsh nodedev-destroy mdev_f7ad1c61_c983_4e47_879a_c05d01004ca7_0000_03_00_0
virsh nodedev-destroy mdev_5cb3ac3e_f1e6_48ec_96e7_9bf9cae73cfc_0000_03_00_0

# to enable the P4-8Q
virsh nodedev-start mdev_857fa60f_5347_4b11_8fc5_eb43d9aca9ff_0000_03_00_0
The below does the opposite.
#! /bin/bash
# this switches from the P4-8Q to the P4-4Qs
# to destroy the P4-8Q
virsh nodedev-destroy mdev_857fa60f_5347_4b11_8fc5_eb43d9aca9ff_0000_03_00_0

# to enable the P4-4Qs
virsh nodedev-destroy mdev_f7ad1c61_c983_4e47_879a_c05d01004ca7_0000_03_00_0
virsh nodedev-destroy mdev_5cb3ac3e_f1e6_48ec_96e7_9bf9cae73cfc_0000_03_00_0
Of course, if you have more than one Tesla P4, you can add more instances to the script.
The last part is to add the new UUID to the cloned VM, so that it’s attached to the P4-8Q instance.
<hostdev mode='subsystem' type='mdev' managed='no' model='vfio-pci' display='on'>
    <source>
        <address uuid='857fa60f-5347-4b11-8fc5-eb43d9aca9ff'/>
    </source>
</hostdev>
Once all VMs that use the P4-4Qs are stopped, you can run the script to enable the P4-8Q and start the VM that has the P4-8Q attached. That’s it! You now have a VM with about twice the graphics performance.
Or do you?
Let’s see. I also doubled the core count to 8C/16T, just because I didn’t want them to sit idle. Below is Cinebench R15, which scaled up nicely to give us double the points with twice the core count, as expected.
| Multi | Single | Multiplier |
| 963 | 92 | 10.46x |
Then we have Fire Strike running on two GRID P4-8Q instances.
| Fire Strike score | Graphics score | Physics score | Combined score | |
| P4-8Q | 8865 | 11361 | 11563 | 2958 |
| P4-4Q | 7580 | 10257 | 7699 | 2557 |
| Delta | +17% | +11% | +50% | +16% |
Well, this doesn’t look so great. We’re getting less than 20% of extra graphics performance by doubling the GPU’s resources and the CPU core count as well. Let’s see Tomb Raider.
| Rise of the Tomb Raider | Avg P4-8Q | Avg P4-4Q | Delta |
| DX11 | 39.59 | 37.32 | +6% |
| DX12 | 51.58 | 37.65 | +37% |
Interestingly enough, the gain was much more significant under DX12, which made me think that we may have been restricted by the CPUs’ single core performance, so I decided to run a round of 3DMark Time Spy on both the P4-4Q and P4-8Q configurations, which is DX12-based.
| Time Spy score | Graphics score | CPU score | |
| P4-8Q | 4179 | 3989 | 5730 |
| P4-4Q | 3592 | 3959 | 2799 |
| Delta | +16% | +1% | +104% |
Not great. The graphics score didn’t change at all, that one percent of difference is just normal variation between runs.
So, I don’t really know what’s going on, but there seems to be some sort of bottleneck that doesn’t let the cards perform better than a certain threshold, even if I double the amount of resources that a vGPU has access to.
I don’t know if this is related to the GRID drivers, I could try using simple PCIe passthrough to directly assign a card to a VM as a PCIe device, but I’ll leave that for a potential second part of this series, otherwise I’ll never be able to get this out of the door.
A note on the choice of Fedora
You may wonder why I decided to use Fedora, and my answer would be that it’s my favourite distro and one that I know inside out. It gets two releases a year with the most recent kernel and drivers and each release is supported for a year after its release. Which is not ideal for this, as we shouldn’t really replace the OS every six month on a server.
If I was building a production system, I would recomemnd RHEL, which has its own verified drivers from NVidia and GUI options for setting up vGPUs, but I couldn’t warrant paying $349 a year for that. SUSE Enterprise Linux would be another paid candidate with long-term support.
For home use, the best choice may be Ubuntu Server, which is very similar to Fedora Server, is free and has an LTS release, so if you’re planning to replicate this build, that’s what I would recommend.
Optimizing game distribution
Steam’s game file transfer should be enabled to allow sharing game files across the VMs, this can be done in the Downloads section of the settings.

You can also set up a lancache docker instance on Fedora and point the VMs to use it as the DNS server, which may be useful for other launchers that don’t have the ability to share game files locally between clients.
Bill of Materials
Essentially, I have four virtual machines, each one as fast as a 1050Ti with a quad-core 4th gen desktop i5 for £520. That’s not bad. The prices marked with a “^” symbol show that those values are estimates based on online prices I found in October 2023 for a compatible part. The rest are the actual purchase prices I paid for the respective items over the prior 1-2 months.
| Motherboard (Supermicro X10SRL-F) | £85^ |
| CPU (Xeon E5-2699v3) | £30 |
| RAM (4x32GB 2133Mhz DDR4 ECC RDIMM) | £65 |
| GPUs (2xTesla P4) | £150 |
| Storage (2×1.6TB SSD DC S3520 + 240GB SSD DC S3520) | £75 |
| PSU (a generic 500W unit) | £35^ |
| Case (an ATX case) | £50^ |
| CPU cooler (an lga2011 cooler) | £15^ |
| Some fans (two, really, some extra case fans may be necessary) | £20^ |
- Mini Guide to Installing an Older Kernel Version – Fedora Discussion (fedoraproject.org) ↩︎
- NVIDIA virtual GPU Software (Quadro vDWS, GRID vPC, GRID vApps) | NVIDIA ↩︎
- Virtual GPU Software User Guide :: NVIDIA Virtual GPU Software Documentation ↩︎
- docker-ce package makes existing KVM guests unusable · Issue #949 · docker/for-linux (github.com) ↩︎
Leave a Reply