Category: Cloud

  • “thin” servers from Thin Clients

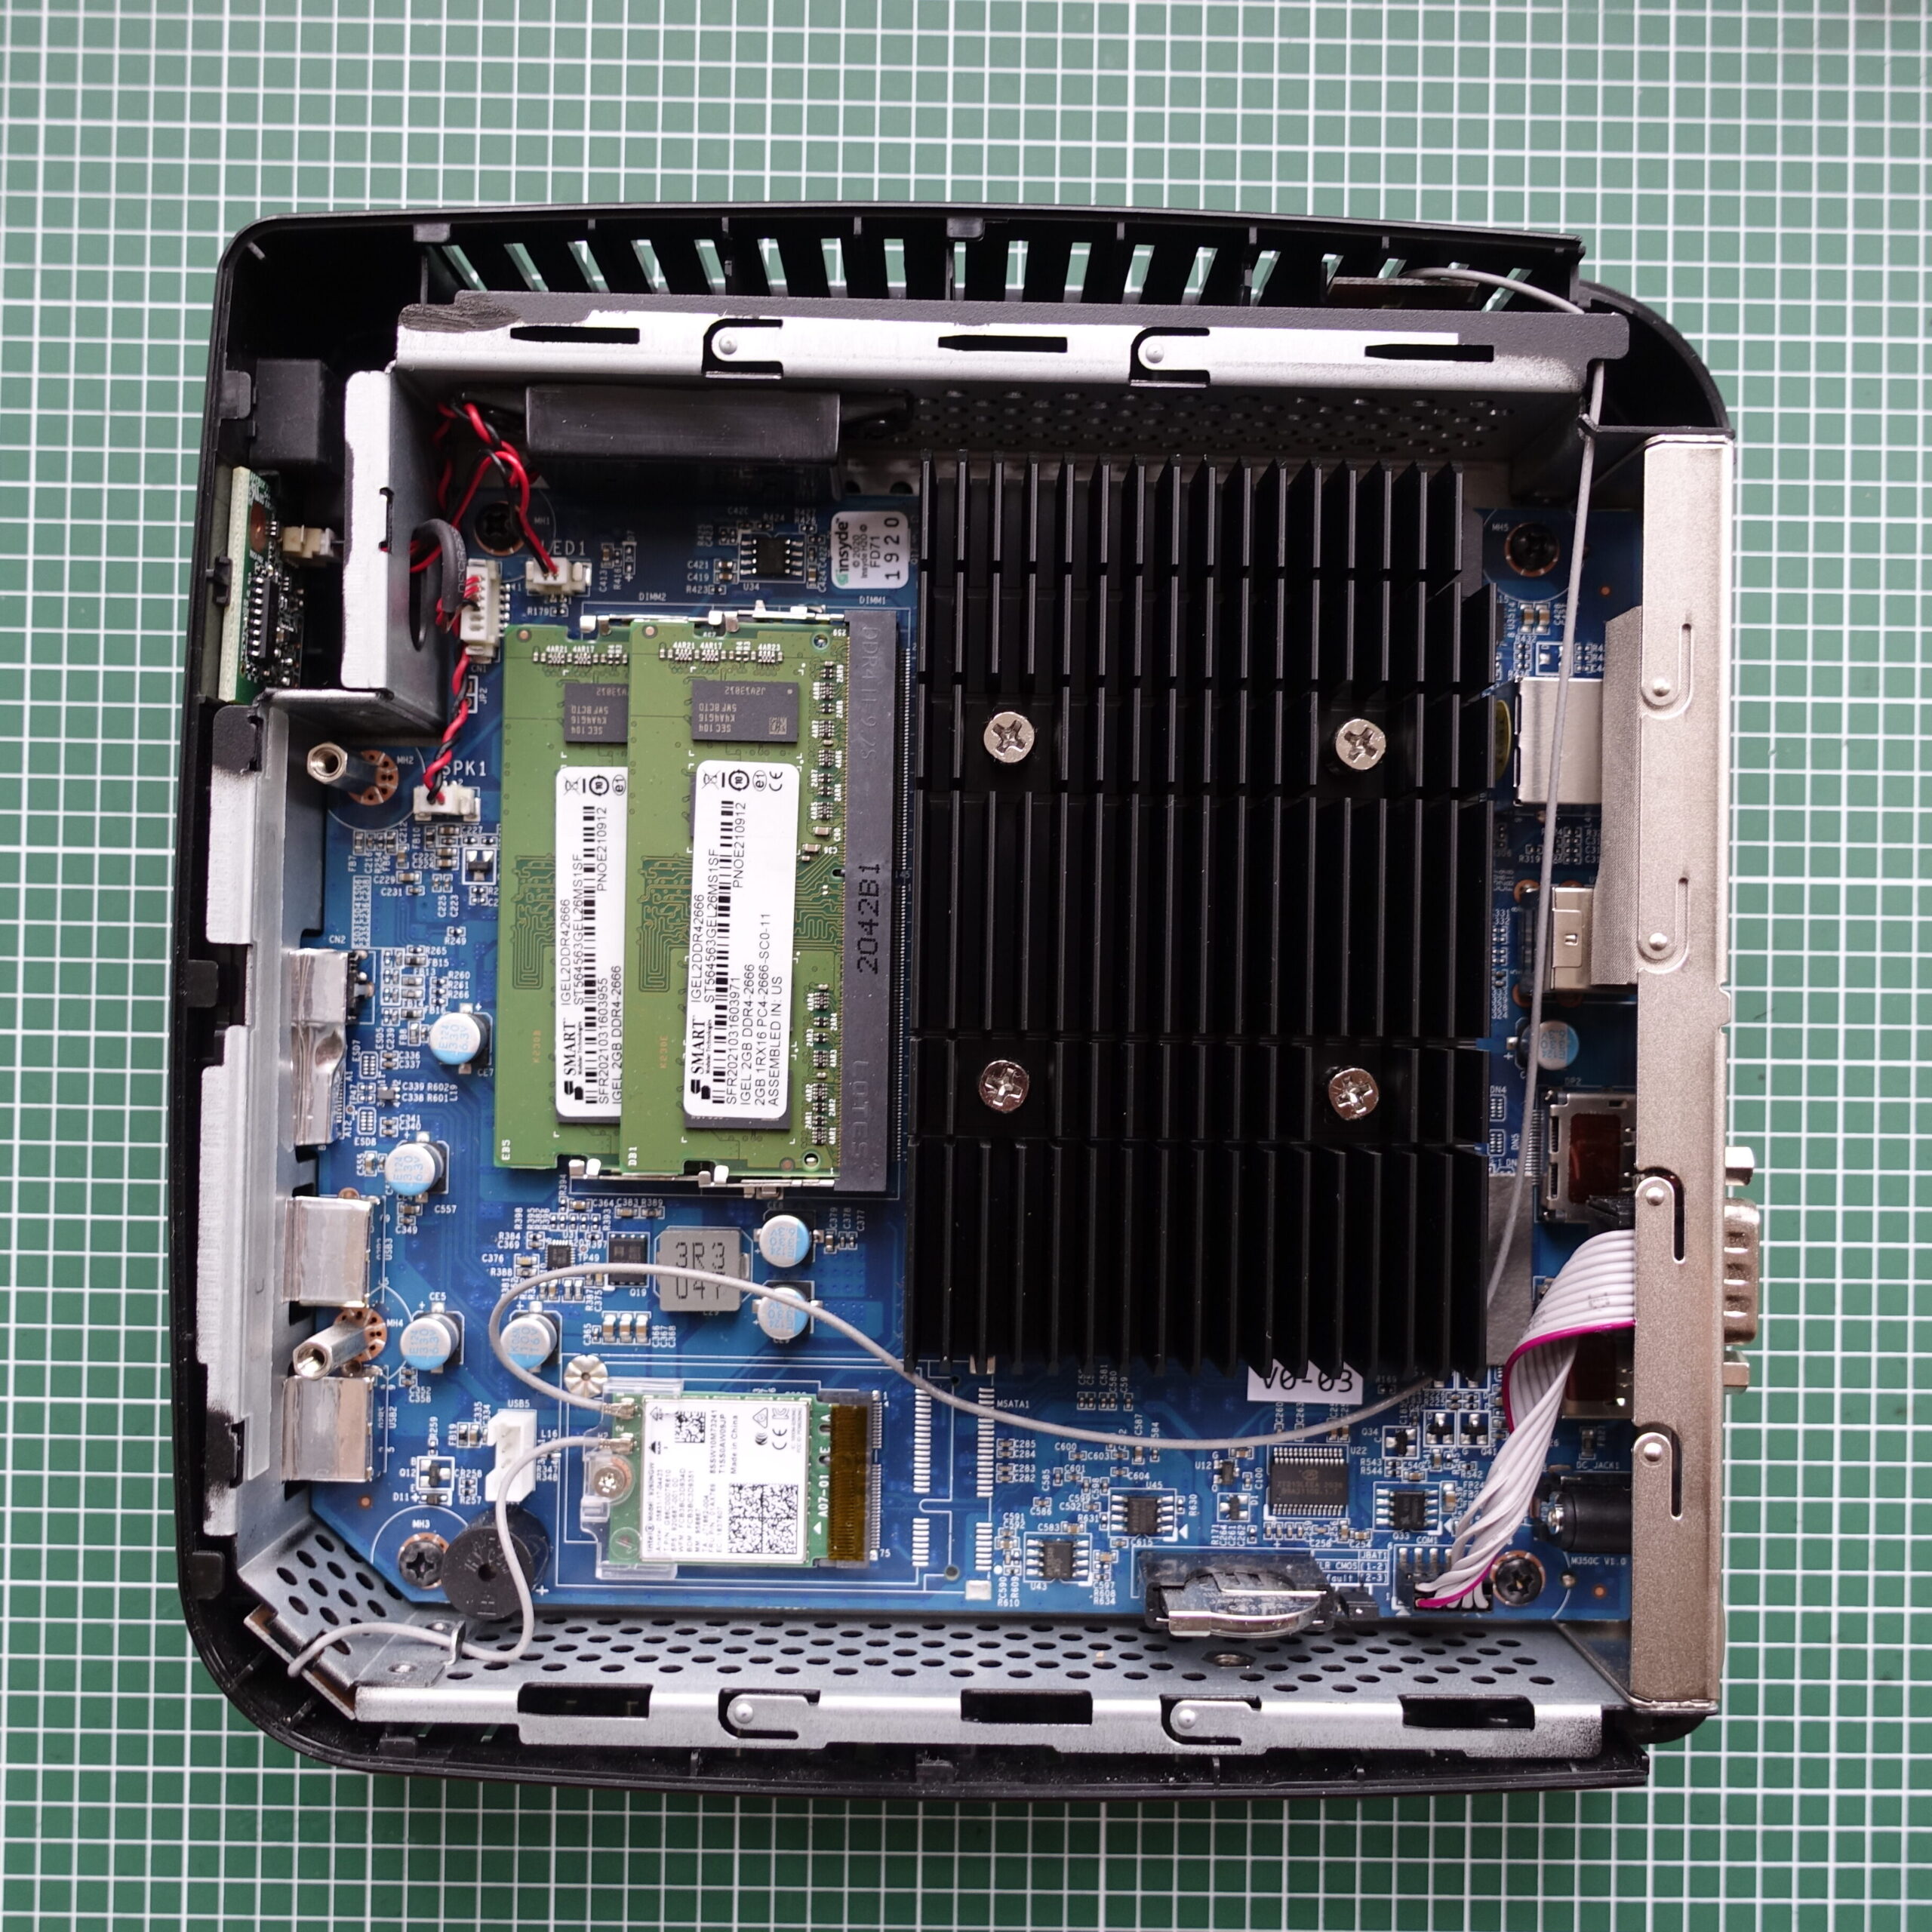
    The hardware

    I managed to snatch two Igel M350C thin clients off of ebay for a very reasonable ~$45 per piece, shipped. Which doesn’t sound all that impressive, but these actually have AMD Ryzen Embedded R1505G CPUs.

    Ryzen Embedded R1505G is a 64-bit dual-core embedded x86 microprocessor introduced by AMD in early 2019. This processor is based on AMD’s Zen microarchitecture and is fabricated on a 14 nm process. The R1505G operates at a base frequency of 2.4 GHz with a TDP of 15 W and a Boost frequency of up to 3.3 GHz. This MPU supports up to 32 GiB of dual-channel DDR4-2400 memory and incorporates Radeon Vega 3 Graphics operating at up to 1 GHz.

    This model supports a configurable TDP-down of 12 W and TDP-up of 25 W.

    Ryzen Embedded R1505G – AMD – WikiChip

    So, I think that helps to put it in perspective. These are very fast CPUs for a thin client, while only sipping about 4W of power in idle and still managing to be fanless. Not the usual atom or AMD G-series with low-performance Puma cores from 2014. Fun fact, the PS4 and Xbox One used the predecessors of these cores, codenamed Jaguar. That’s why their CPUs are relatively weak, even though they have 8 cores.

    The die of the CPU “Banded Kestrel”, courtesy of Fritzchens Fritz on Flickr

    This image shows that the CPU does have four physical cores and there are 11 CUs for the integrated GPU, but most of it has been disabled, as we’re “only” getting two cores and 3 CUs. That is still very much adequate for the target market and it allows AMD to still sell most of the defective chips instead of creating a smaller, true dual-core CPU design.

    The thin clients themselves come with two DDR4 sodimm slots, populated with 2x2GB modules, which isn’t much, but at least the memory is not soldered. What is soldered, however, is the 8GB internal eMMC drive and there is no way to replace it or install another drive. That’s a problem. On one hand, it won’t use much power, but on the other hand, I’ll need to add external storage. Fortunately, there are three high speed USB3 ports, so there is an easy, but not so elegant way to do that. The internal heatsink is pretty large and there does seem to me an unpopulated mPCIe slot, although unpopulated in a way that the slot itself is missing and only the solder pads are present.

    The internals

    They come with a proprietary Linux-based OS called Igel OS, which requires a license. However, it’s quite easy to format the internal eMMC and install any OS on it. Apparently, the BIOS password can be removed by resetting the BIOS using the onboard jumper, which is a joke, but hey, at least it saved me the time of cross-flashing the non-password-protected BIOS.

    Before I proceeded with the setup, I wanted to spin up Windows on one of them just for fun. You may be aware that it actually requires a 32GB hard disk, but there is an unofficial stripped-down variant of Windows 10, called Tiny10, which installed just fine and also had a spare gig or two on the disk. This can make a fun little thin client for Parsec or other RDP client with a really nice user experience, as the integrated Vega 3 GPU has hardware decoders for both H.264 and H.265.

    Out of curiosity, I did some power measurements on them and one of them in idle consumed between 3.9-4.4W, while two, connected to the same 12V power supply with a Y-splitter topped out at 6.5W, making it 3.3W per thin client. The reason why two don’t use twice the power is the conversion loss in the PSU. This is very close to the 2.7W of a Raspberry Pi 4B. The SSDs add an extra 0.7-1W per device when they are in idle, making the power consumption of a thin client with two SSDs ~7.2W.

    The plan

    I intend to use these thin clients as low power servers at remote locations. The aim is to make them fully autonomous and self-contained. I won’t be in direct control of the network environments of the sites where these will be deployed. It is also possible that they may be behind CG-NAT or dual NAT, so the possibility of setting up port-forwarding rules or UPnP should not be assumed.

    They may end up being thousands of miles away from me in the homes of not particularly tech-savvy people, so making them work under most conditions is a must, as they won’t be easily reachable for debugging.

    There are three things I would like to use them as:

    • Distributed file storage, using Syncthing
    • VPN exit nodes, using Tailscale
    • I might as well add a RIPE Atlas software probe

    I think it is important to note that while these will be used as file storage, they will not be storing the only copies of the files. Everything that will be mirrored to them will also be stored on another array on a NAS with redundancy. The point of these thin servers is not to provide redundancy on their own, but to add geo-redundancy by essentially cloning the data to sites at different locations, ensuring that there will be an least one copy remaining in the event of a natural disaster or other physical intrusion. The chances of both the NAS and the thin servers failing irrecoverably at the same time are not zero, but slim enough that I’m willing to take them.

    The storage

    As mentioned before, I needed some external storage so I used two 1TB Crucial MX500 SSDs for each thin client, connecting them with Sabrent EC-SSHD USB3 (5Gb/s) to SATA adapers. These are not a full enclosure, so they allow convection to cool the drives instead of isolating them inside a plastic casing and they also don’t add any extra thickness, which made it easier to mount them on the side of the thin clients with some zipties. Not particularly nice, but it works well enough and I don’t intend to put these on display.

    The SSD “mounts”

    The drawback is that like many other USB enclosures, these do reuse the same serial numbers, so out of the 5 adapters, three had the same serial number, which made Fedora think they were essentially the same drive. I managed to shuffle them around so that no two of those three were used by one thin client, but it’s something that could potentially cause a problem. I think that the different manufacturing batches probably used a different serial and I managed to get them from three different batches with serial numbers that were like [A, A, A, B, C], so I could pair them up as A-B and A-C, which worked.

    The SSDs are cheap consumer drives with TLC flash which I had lying around and since I won’t be writing huge amounts of data to them, they will be fine.

    These volumes will be encrypted, so that the files won’t be accessible if someone decides to plug them into their own PC. Yes, I know, I will need to store the decryption keys somewhere, which is likely going to be the internal eMMC and they could very well be extracted from there and thus used to unlock the drives, but someone would have to be in really desperate need of my files to go that far and I’m willing to take that risk. Syncthing also has a feature for adding untrusted devices and encrypting the data on them, although it is still in beta and may not be fully functional. This essentially encrypts the files on the destination nodes with a key that’s set on the source node.

    The internal 8GB eMMC will only be used as a boot drive and all containers and related data will be stored on the external drives.

    The execution

    I simply installed the standard Fedora Linux 37 Server Edition on the internal eMMC from a USB drive. UEFI boot works as expected and after the install and a dnf upgrade, the /boot partition is at 0.31/1.0GB and / is at 2.8/6.0GB. This isn’t too bad. I still have a few gigabytes left to install docker and I can move the container images to the external drives.

    It is important that all users including root have strong passwords, otherwise there isn’t much point in encrypting the external drives.

    Setting up the drives

    The ideal way to configure the drives would be to create a single volume, spanning across both disks and I was considering to utilize ZFS for that. Now, using external drives with ZFS, or really any other filesystem, for storing important data is generally a bad idea.

    Fedora also has support for Stratis which is a storage management tool and it’s already embedded into the OS. They also made it accessible from the GUI, which is quite convenient and it supports encryption as well, for which it uses the cryptsetup library and the LUKS2 format. It has support for using a TPM or a remote Tang server for handling the keys. Unfortunately, the thin clients don’t have TPMs and I wasn’t going to set up a key server for this either.

    In the end, I went with a simple software RAID0 pool and an XFS filesystem on top of that, encrypted using LUKS2. It’s simple and fast and I would probably not use the added capabilities of ZFS or Stratis anyway. The passphrase is stored in the keyring and is automatically loaded after boot, so the drives are automatically unlocked.

    The containers

    The first step was to install docker and then move the data-root directory of Docker, so that it stores everything on the external drives instead of the eMMC. This can be done as shown below.

    # stop docker
    sudo systemctl stop docker
    # create a new config file at /etc/docker/daemon.json
    sudo touch /etc/docker/daemon.json
    # add the below to the file using your favourite text editor
    {
      "data-root": "/<path_to_external_drive_array>/docker"
    }
    # save and restart docker
    sudo systemctl start docker

    All containers will need to be set to start automatically, for which there is a handy restart: always flag in compose.

    The easiest one is the RIPE Atlas software probe, for which there is a github repo with a very detailed tutorial. This doesn’t need anything special, the compose file can be started as-is with docker compose up -d. The below is what I used. This will create a public key file at /var/atlas-probe/etc/probe_key.pub which you have to register at ripe.

    version: "2.0"
    
    services:
      ripe-atlas:
        image: jamesits/ripe-atlas:latest
        restart: always
        environment:
          RXTXRPT: "yes"
        volumes:
          - "/var/atlas-probe/etc:/var/atlas-probe/etc"
          - "/var/atlas-probe/status:/var/atlas-probe/status"
        cap_drop:
          - ALL
        cap_add:
          - CHOWN
          - SETUID
          - SETGID
          - DAC_OVERRIDE
          - NET_RAW
        mem_limit: "64000000000"
        mem_reservation: 64m
        labels:
          - "traefik.enable=false"
          - "com.centurylinklabs.watchtower.enable=true"
        logging:
          driver: json-file
          options:
             max-size: 10m
        # security_opt:
        #   - seccomp:unconfined

    Syncthing also has a great tutorial in its official repo, so using the below compose file should yield a usable instance.

    version: "3"
    
    services:
      syncthing:
        image: syncthing/syncthing
        container_name: syncthing
        hostname: my-syncthing
        environment:
          - PUID=1000
          - PGID=1000
        volumes:
          - /<local>/<path>:/var/syncthing
        network_mode: host
        restart: unless-stopped

    You will need to allow the ports it uses through the firewall in Fedora, because the network mode is set to host. This can be done in Cockpit, just add the pre-defined syncthing and syncthing-gui services to the Public Zone, as shown below.

    Additionally, once it’s up and running, you can add your server/NAS to Syncthing and set up Auto Accept of shares, so that the client will automatically accept any shares that you share with it from the server.

    Tailscale

    I’ve attempted to use the tailscale container, but I’ve been unable to set up the firewall rules to make it work as an exit node. So instead of spending a few hours trying to figure out what’s wrong, I decided to use the .rpm package instead. In addition to the installation procedure, we need to configure the firewall according to this guide to allow the exit node to redirect all network traffic from the clients. This will also have the added benefit of allowing us to stop and restart docker remotely, if we ever need to.

    To authenticate the client, we have to execute the below after the set-up is complete. This will persist across reboots. For some reason, the machine name changes after a reboot to localhost-0, but we can manually override it in the tailscale GUI.

    # authenticate and enable exit node
    sudo tailscale up --advertise-exit-node

    It’s also important to disable the key expiry once the clients are added, so they won’t need to be re-authenticated every 90 days.

    Final touches

    Of course, all passwords need to be changed, both for the OS and the Syncthing GUI, including the root account, and stored, along with the drive encryption keys.

    The Syncthing GUI could also be disabled by removing the firewall rule after setting it up to prevent unauthorized access and prevent brute-forcing attempts.

    It is a good idea to set up the thin clients to turn on automatically when they are powered up, but how this can be done is highly dependent on the BIOS of the machine you’re using. They often have a very cut-down BIOS, but in my experience, this option is still present in almost all of them.

    I’m still yet to deploy them “in the field”, but I think the above should suffice in making them work. I managed to obtain some inexpensive 8GB DDR4 modules, so they got an upgrade to 16GB RAM each, which is nice, probably unnecessary. I’ll report back on how well they work once they are in place.

  • Deploying WordPress on ORACLE Cloud

    This is a guide on how to deploy WordPress (or any other container-based service) on ORACLE Cloud and set up a URL with a Dynamic DNS provider. You could use the guide for a Teamspeak or Minecraft server as well. We’ll use a free-tier ARM-based VM, which utilizes their Ampere Altra 80C CPU. The free-tier allows you to use 4 CPU cores and 24GB of RAM in total. This can be split between multiple VMs, such as 2/1/1 cores with 12/6/6GB or RAM respectively. The bandwidth you get is 1Gb/s per core, so for a 2-core instance it’s doubled.

    The guide is composed of four main parts:

    • Setting up an OCI account and the VM
    • Installing Docker and Docker compose with a management UI
    • Installing WordPress in the Docker environment
    • Setting up a domain name and an A record on HE’s free DNS servers

    OCI (Oracle Cloud Infrastructure) uses Cloud Accounts, which is an ID for the cloud account and you can have multiple user IDs with their own email addresses and privilege levels associated to the Cloud Account. CAs are tied to a geographical region, in which you will be able to create the free-tier VMs. You will NOT be able to change this later (as of 2023).

    Next, go to the compute instances page and click “Create instance”. On the next page, enter a name and click “edit” under the “Image and shape” section. Then change the shape to an “VM.Standard.A1.Flex” instance as shown below.

    You can add more cores and memory, but I found that WordPress is quite happy with a single core and 6GB of RAM, so that’s what I used. Under the SSH keys section, you’ll have to save the private key, as that’s what you’ll use to SSH into the machine for setup. There are no passwords.

    Under the “Boot volume” section, you can specify a custom size, the default is 46.4GB. In the free tier, you get a total of 400GB space across all of your boot volumes and backups. You can split that up however you you want, but I don’t think you would need more than the default, unless your site is pretty big or you’re planning to run other containers alongside WP in the same VM. Once you’re happy with the settings, click “Create”.

    Now that we have a VM with Oracle Linux 8, we need to install Docker, Docker Compose and a test container.

    The command blocks below are already prefixed with sudo for convenience. Exercise caution when copying and executing them in a live environment.

    Then let’s begin. You’ve got the ssh .key file from when you created the VM and its public IP. To connect to it, use:

    ssh -i <path_of_.ssh_file> opc@<public_ip>

    You should now have a command prompt inside the VM. To update the OS, install Docker and Docker Compose, execute the below:

    # update the packages
    sudo dnf update -y
    # add the Docker repo to the package manager
    sudo dnf config-manager --add-repo=https://download.docker.com/linux/centos/docker-ce.repo
    # install Docker
    sudo dnf install docker-ce -y
    # enable and start the service
    sudo systemctl enable --now docker
    # install the Docker Compose plugin, if necessary
    sudo dnf install docker-compose-plugin
    # enjoy

    Now we should have everything up and running. To check the configuration, we can use sudo docker info and run a test container with sudo docker run hello-world. With this, Docker is ready to use.

    If you don’t want to to use the sudo prefix for everything docker-related, add the ocp user to the docker group.

    # create docker group, although it should already exist
    sudo groupadd docker
    # add the opc user to the group
    sudo usermod -aG docker opc
    # re-evaluate group memberships without logging out
    newgrp docker

    Let’s talk about Docker Compose. To avoid possible confusion, I would first like to mention that there are two variants of compose. There is Compose Standalone, which is used with the docker-compose command and there is the Compose plugin, which is a plugin for Docker. This requires the docker compose command. Note that the dash has been replaced with whitespace. This is what we’re using and we’ve already installed it in the code block above.

    To install WordPress, we need to create a folder and inside that we need to add a file named docker-compose.yaml with the contents below:

    version: "3.9"
        
    services:
      db:
        image: mysql:latest
        volumes:
          - db_data:/var/lib/mysql
        restart: unless-stopped
        environment:
          MYSQL_ROOT_PASSWORD: somewordpress
          MYSQL_DATABASE: wordpress
          MYSQL_USER: wordpress
          MYSQL_PASSWORD: wordpress
        
      wordpress:
        depends_on:
          - db
        image: wordpress:latest
        volumes:
          - wordpress_data:/var/www/html
        ports:
          - "80:80"
        restart: unless-stopped
        environment:
          WORDPRESS_DB_HOST: db
          WORDPRESS_DB_USER: wordpress
          WORDPRESS_DB_PASSWORD: wordpress
          WORDPRESS_DB_NAME: wordpress
    volumes:
      db_data: {}
      wordpress_data: {}

    This contains all the data that Docker requires to create an environment for WordPress. If you’re curious about what the commands mean and how to tweak them, you can find a guide on wordpress.org.

    Execute the docker compose up -d command in the folder containing the .yaml file and your stack should be up and running in a few seconds. Note that the website will not yet be accessible at this point.

    You may receive an error such as the one below when attempting to start the stack: no matching manifest for linux/arm64/v8 in the manifest list entries. In this case, you can manually download the two images with docker pull wordpress and docker pull mysql. This will pull the linux/arm64/v8 variants of the images.

    Next, we have to open the ports. Once on the VM’s firewall and once on the Virtual Cloud Network.

    The firewall is very simple to update:

    # open port 80 for TCP
    sudo firewall-cmd --permanent --zone=public --add-port=80/tcp
    # reload firewall settings
    sudo firewall-cmd --reload

    Next we need to set up something similar to a port forwarding rule on OCI. There is a subnet connected to the VNIC of our Compute Instance, which has a Security List that behaves very much like a firewall. We need to add an extra rule to this to allow inbound connections on port 80.

    Click on the subnet name in the details page of the Compute Instance.

    Then you can select the default Security List.

    And finally add an Ingress Rule.

    We should allow incoming traffic to port 80 from all source IPs. This will look like the below:

    Once this is saved, you can go to the public IP displayed on the Compute Instance’s details page and you should be greeted with your WordPress’s setup page.

    The next stage depends on how you wish to set things up. As ORACLE provides a fixed IPv4 address, Dynamic DNS is not a requirement here. You can simply buy a domain name and add an A record, pointing to your site’s public IPv4 and be done with it. That’s what I’m going to do here.

    I purchased the domain from GoDaddy. There website is very simple, so I won’t explain the process here. You can use them as the DNS / name server, but I wanted to delegate that to Hurricane Electric. There, you’ll have an option to override the nameservers. The reason why I chose to go with HE instead is because they support Dynamic DNS and while this domain won’t be using it for the time being, I may set up others there that will. If you’re happy with using them, you won’t really need HE, as you can directly add an A-record on their website. However, if you do want to change them, carry on reading below.

    Go and register on Hurricane Electric Hosted DNS (he.net). Once that’s done, log in and choose “Add a new domain”. Simply enter the domain name you chose and click “Add Domain!”. You’ll be greeted with the below, telling you that the delegation was not found, so let’s fix it.

    Go back to GoDaddy and click “DNS” on the right of your new domain name, which should take you to the DNS Management page. In the Nameservers section, click on “Change”, then choose “Enter my own nameservers (advanced)” in the popup. Enter the five nameservers below:

    ns1.he.net
    ns2.he.net
    ns3.he.net
    ns4.he.net
    ns5.he.net

    Save it and grab a tea. You’ll probably need to wait until the next day to proceed, as delegating a domain from one nameserver to another may take up to 24 hours. You’re also done on GoDaddy, the rest of the setup will need to be done on HE.

    So, 24 hours later, you can go back to HE and click the “Edit Zone” icon just on the left of the domain name you added. Here, you need to create a new A Record, so click “New A” and fill in the popup as shown below:

    Once that’s done, you should be able to reach your website using the URL. You may need to refresh the DNS resolver if you’re using pfSense or any other local DNS cache.

    Tweaks

    I usually like to increase the file size limits, which can be done by adding a php.ini file to the root folder of the docker volume that WordPress is using. To get the path, use the commands below:

    # get the location of the docker volume
    docker volume inspect wordpress_wordpress_data
    # this will give us the "Mountpoint" on the local filesystem
    # we need to be root to enter this folder
    sudo su
    # navigate to the folder containing the docker volume
    cd <mountpoint> <going to be something in /var/lib/docker/volumes...>

    Now that we’re in the root folder of the wordpress_data docker volume, we need to create a php.ini file there with the below contents. And likely restart WordPress after we save it using the docker compose restart command from the folder containing the docker-compose.yaml file.

    memory_limit = 256M
    post_max_size = 128M
    upload_max_filesize = 512M

    The above changed the limits set by the hosting provider, which is us in this case. To change the limits set by WordPress, you will need to install a plugin called “Wp Maximum Upload File Size” by CodePopular. That will let you increase the limits within WordPress.

    If you’d like to transfer the contents of an existing WP site, you can use the “All-in-One WP Migration” plugin, version 6.77. The version is important, as newer versions may have issues when restoring backups. There is a guide on how to use it here. Install it on both instances, back up the old one and restore it on the new one. That’s it.

    By now you should have a working WordPress installation, so enjoy! This very instance has been set up using this guide, so you’re most likely getting this page from ORACLE’s datacenters in London.